Affichage des articles dont le libellé est Windows. Afficher tous les articles

MCP 70-350 : Installing ISA Server 2004

Lesson 1: Planning an ISA Server Deployment

The ISA Server Deployment Planning Process :

Most organizations install ISA Server to address security requirements. ISA Server is a firewall that is likely to be among the critical components to ensuring that your organization’s network is secure. In addition, the ISA Server computer is likely to be the primary connection point for all internal network traffic to access the Internet. This means that when you design your ISA Server deployment, you must consider a wide variety of security and functional requirements. The following is an overview of the process of planning an ISA Server deployment.

1. Understand the current network infrastructure. The first step in planning an ISA Server deployment is to understand the current networking environment. When you start planning, collect network diagrams that provide details on the network infrastructure. These diagrams should include the Internet Protocol (IP) networks, router configurations, and client and server networking configuration.
Collect information on the current configuration of network services. For example, all internal clients must be able to resolve Domain Name System (DNS) names on the Internet to connect to Internet resources. You need to understand how clients do this now. Also collect information about other network services such as Dynamic Host Configuration Protocol (DHCP) and Windows Internet Naming Service (WINS) if you have Microsoft Windows NT or Microsoft Windows 2000 clients.
Collect information about the current domain structure. ISA Server can be integrated with Active Directory directory service to enable authentication.

2. Review company security policies. Every organization should have security policies. These policies usually include general security requirements such as Internet or e-mail usage policies. The policies can also be very specific and define what protocols are not allowed through the firewall, what Web sites users can access, and what types of information can be sent from the internal network to the Internet. For example, most organizations have policies defining what types of customer information can be sent in an e-mail.

3. Plan the required network infrastructure. For your ISA Server installation to meet the company requirements, you must plan for some specific network infrastructure components. For example, if the ISA Server computer is an Internet-edge firewall and is the only access point to the Internet, you must ensure that all client computers can connect to the ISA Server computer. If you have a single network, this solution can be as simple as configuring the default gateway on each client computer to use the internal network interface on the server running ISA Server. If you have multiple locations within your organization, or if you deploy multiple ISA Servers, this solution can be more complex.

Your ISA Server implementation may also depend on additional network infrastructure components such as DNS, DHCP, and Certificate Services. These components must be taken into account when planning an ISA Server installation.

4. Plan for branch office installations. If your organization has more than one location, you must also plan for how the branch office networks will be integrated with the main office. In some cases, you may have existing wide area network (WAN) connections between the offices with routing already in place. In other cases, you may plan to replace the WAN link with a site-to-site virtual private network (VPN) or plan to deploy an ISA Server in each branch office.

5. Plan for availability and fault tolerance. Each organization will have different requirements regarding availability and fault tolerance. In some organizations (for example, organizations that are publishing e-commerce sites that are doing several million dollars of business per day), a few minutes of downtime or even slow response times can cost large amounts of money. Other organizations may be using ISA Server just to provide Internet access for internal users. In this case, downtime may not be as critical. ISA Server can be configured to enable fault tolerance, so you must understand your organization’s requirements to get the right level of availability.

6. Plan for access to the Internet. Most companies that deploy ISA Server use it as a proxy server for users to access the Internet. Some organizations enable full access to the Internet so that all users can use all protocols to access any Internet resource. Other organizations limit access based on protocols or applications, and users or groups, and they also limit users’ access to Web sites.
Once you have gathered your organization’s requirements for granting Internet access, you can plan the ISA Server access rule configuration to meet the organization’s Internet access and caching requirements.

7. Plan the ISA Server client implementation and deployment. An essential part of deploying an ISA Server infrastructure is to plan for ISA Server client configuration and deployment. ISA Server supports three clients: SecureNAT clients, Web Proxy clients, and Firewall clients. The use of each client has advantages and disadvantages. As part of your ISA Server deployment, you must know why you use each client and how to configure each client.

8. Plan for server publishing. Most organizations also publish some internal resources to the Internet. Because this allows network traffic from the Internet to your internal network, it is essential that the connection between the internal servers is as secure as possible.

9. Plan for VPN deployment. ISA Server can operate as a VPN remote access server for external clients and as a VPN gateway for site-to-site VPNs. If you plan to deploy ISA Server in either configuration, include this in your planning. An extra level of planning is required if you choose to implement VPN network quarantine. With VPN network quarantine, you can restrict access to the internal network until the VPN clients pass a security configuration check. To perform the security configuration check, you must run a script or application on the client computer. The script can check for virtually any setting on the computer. In your planning, therefore, you must decide which security settings you will check on the client computer. This can be complicated. For example, you may decide that all clients that connect to your network must have an antivirus application installed, and that the virus detection files must be up to date. However, if you allow users to use any antivirus software, the script must check for all acceptable antivirus applications.The script that checks the security configuration on the client computer can become very complicated, so you must plan to have very competent scripting help available.

MCP 70-299 : Module 12 Securing Remote Access

Lesson 3: Configuring Remote Access Clients

You can configure clients to connect to a remote access server in one of two ways: by using the network connection properties or by using the Connection Manager Administration Kit (CMAK). Manually configuring a connection by using network connection properties is convenient when you are using the default security settings or when you need to configure fewer than ten clients. However, it would not be possible to configure and maintain VPN or dial-up network connection configurations on hundreds or thousands of client computers.

The CMAK allows you to easily configure large numbers of clients by creating an executable file that you can distribute to your users. When your users run the file, it creates a dial-up or VPN connection with your customized security settings. If you later change authentication or encryption methods, you can re-run the CMAK and distribute a new executable file to overwrite the previous configuration. You can even automate the distribution of the CMAK executable file by distributing it with a Group Policy object.

Configuring Client-Side Authentication Protocols :

You create a remote access connection by using the New Connection Wizard, as described in Lesson 2, Exercise 2. However, the New Connection Wizard does not allow you to configure the acceptable authentication or encryption settings for the connection. To view or modify the authentication protocols enabled for a remote access connection on the client, open the properties dialog box of the dial-up or VPN connection on the client, and then click the Security tab.

The Typical option is selected, and a secured password and data encryption are required. Automatically Use My Windows Logon Name And Password is not selected. This default setting is the
more secure choice. If you choose to automatically use the current credentials, an intruder who takes over the active desktop of the client can successfully authenticate and connect to your internal network, potentially compromising far more than a single computer. When the option is cleared, the user must provide credentials each time a connection is made.

CMAK Wizard :

Manually configuring remote access connections on clients is straightforward, but configuring
hundreds or thousands of clients would be impossible. Unfortunately, you cannot use Group Policy objects to directly control a user’s available network connections. However, you can use the CMAK to create an executable file that you can deploy to users. When users run this file, the CMAK adds a connection by using the settings you specified with the CMAK wizard.

Though most of the pages of the wizard do not involve security settings, there are several important pages that you can use to control the security settings on the resulting network connection. Specifically, the VPN Entries and Dial-Up Networking Entries pages allow you to restrict authentication and encryption on the client. The VPN Entries and Dial-Up Networking Entries pages are identical, except that the VPN settings allow you to choose between PPTP and L2TP.

11 Deploying, Configuring, and Managing SSL Certificates

Lesson 2: Configuring SSL for IIS

The most common use of SSL is to authenticate Web servers and to encrypt communications
between Web browsers and Web servers. SSL, when used to protect HTTP, is referred to as Hypertext Transfer Protocol Secure (HTTPS). HTTPS is used by virtually every e-commerce Web site on the Internet to protect private information about end users and to protect end users from submitting private information to a rogue server impersonating another server.

Internet Information Services (IIS) 6.0, included with Windows Server 2003, supports both server and client SSL certificates. Configuring these certificates is simple when you are managing a single Web site with a single server certificate. However, managing certificates can be complicated when a server has multiple certificates or when you are using client certificates for authentication.

Using SSL Certificates with a Web Site :
You can use SSL certificates to allow users to verify the identity of your Web site and to encrypt traffic sent between the client and the Web site. It is important to understand that an SSL certificate identifies a Web site, and not a Web server. A single Web server can host multiple Web sites. Alternatively, a single Web site can be hosted on multiple Web servers to provide redundancy and scalability.

For example, an Internet service provider (ISP) that hosts Web sites for 20 customers on a single Web server needs 20 SSL certificates to allow each site to use encryption. Alternatively, if an ISP stores a copy of a Web site on 10 different servers to allow the Web site to remain online in the event of a hardware failure, the same certificate can be installed on all 10 servers.

SSL certificates use the fully qualified domain name (FQDN) to identify the Web site.When the client retrieves the site’s SSL certificate, the client checks the FQDN of the Web site against the subject name, also known as the common name, listed in the certificate. Checking the name used to identify the site against the name listed in the certificate prevents a rogue Web site from intercepting traffic destined for a different site.

The Web Server Certificate Wizard :
Using HTTPS on an IIS Web server requires the server to have a certificate installed and configured. The exact process you will use to configure the certificate varies depending on the source of the certificate; however, you will always use the Web Server Certificate Wizard to perform the configuration. To launch the Web Server Certificate Wizard:
1. Click Start, click Administrative Tools, and then click Internet Information Services (IIS) Manager.
2. Expand the computer name, and then expand Web Sites. Right-click the Web site for which you want to configure an SSL certificate, and then click Properties.
3. Click the Directory Security tab, and then click the Server Certificate button. The Web Server Certificate Wizard appears.

You can use the Web Server Certificate Wizard to request a new certificate, assign an existing certificate, renew a certificate, and delete a certificate, as described in the following sections.

10 Planning and Implementing Security for Wireless Networks

Wi-Fi Protected Access :
Although WEP with dynamic re-keying is secure enough to meet the needs of most organizations, WEP still has security weaknesses. WEP still uses a separate static key for broadcast packets. An attacker can analyze these broadcast packets to build a map of private IP addresses and computer names. WEP keys have to be renewed frequently, which places an additional burden on RADIUS services.

To address these lingering weaknesses with WEP, the Wi-Fi Alliance, a consortium of the leading wireless network equipment vendors, developed Wi-Fi Protected Access (WPA). WPA can use the same authentication mechanisms and encryption algorithms as WEP. This compatibility allows support for WPA to be added to WAPs with a simple firmware upgrade. However, WPA virtually eliminates WEP’s most exploited vulnerability by using a unique encryption key for each packet.

Other Wireless Security Techniques :
WEP and WPA are the most important wireless network security techniques. However,there are several secondary security techniques that you should be familiar with: media access control (MAC) address filtering, disabling SSID broadcasts, and VPNs.

MAC address filtering
One common technique used to make it more difficult for a casual user to connect to your wireless network is to configure your WAPs to allow only a predefined set of MAC addresses. Just like wired Ethernet cards, every wireless network card is assigned a unique MAC address by the manufacturer.

When a WAP is configured to use MAC address filtering, it will ignore any messages from wireless cards that use a MAC address not on the approved list. While this does improve security, it has significant manageability drawbacks. First, you must manually maintain the list of MAC addresses on your WAP, which would be impossible to do if you managed more than a dozen computers or multiple WAPs. Second, WAPs typically have limited memory and might not be able to store your organization’s complete list of MAC addresses. Third, if an attacker is knowledgeable and determined enough to
circumvent your WEP or WPA encryption, the attacker will also be able to identify and spoof an approved MAC address.

Disabling SSID broadcasts :
WAPs provide the option of disabling SSID broadcasts, but this should not be treated as a security feature. SSID broadcasts allow wireless clients to detect an available wireless network. In fact, Windows XP displays a notification to the user when it first receives a SSID broadcast from a wireless network. This is convenient; if you want users to be actively notified of the presence of the wireless client, you should enable SSID broadcasts.

Disabling SSID broadcasts will prevent the casual computer user from discovering your network, but it does nothing to prevent a skilled attacker from detecting your network. For example, a user with the free Network Stumbler tool installed can quickly identify the SSID of a wireless network that has SSID broadcasts disabled, because 802.11 association/ disassociation messages are always sent unencrypted and contain the SSID that the client wants to associate to or disassociate from.

VPNs :
While a VPN is an excellent solution for securely traversing a public network such as the Internet, VPNs are not the best solution for securing wireless networks. For this kind of application, a VPN is unnecessarily complex and costly. It adds little additional security to dynamic WEP, but it significantly increases costs, reduces usability, and removes important pieces of the functionality.

VPN clients usually require the user to initiate a connection to the VPN server; therefore, the connection will never be as transparent as a wired network connection. Non-Microsoft VPN clients might also prompt for logon credentials, in addition to the standard network or domain logon, when the connection is established. If the VPN disconnects because of a poor wireless signal or because the user is roaming between WAPs, the user has to repeat the connection process.

Lesson 2: Monitoring IPSec

Monitoring IPSec is important for verifying that IPSec is working correctly in your organization.
You will also need to closely monitor IPSec if you are having a problem implementing it or if you experience network connectivity problems that might be related to IPSec. This lesson will describe the various tools that you can use to monitor IPSec.

IP Security Monitor Snap-In :

IP Security Monitor is a Windows XP and Windows Server 2003 snap-in used to monitor and troubleshoot IPSec. If an IPSec policy is active, you can use this console to examine the policy and its operations.
Information in the IP Security Monitor snap-in is divided into three nodes: Active Policy, Main Mode, and Quick Mode. The Active Policy node, as shown in Figure 9.4, displays information about the currently assigned policy. This information includes the policy’s name, last modified date, and origin. If you are unsure about how a particular policy was applied to a computer, check this node to identify the GPO that assigned the policy.

Event Viewer :
As with many features of Windows Server 2003, you can configure IPSec to add events to the event logs. This is useful for verifying that IPSec is functioning correctly, for troubleshooting problems with IPSec, and for detecting successful or unsuccessful intrusion attempts. IPSec can generate events for two types of actions: successful and unsuccessful negotiations and dropped packets.

Auditing IPSec negotiations
The creation and deletion of IPSec SAs are audited as network logon events. To audit these events, enable success or failure auditing for the Audit Logon Events audit policy for your domain or local computer. IPSec records the success or failure of each Main Mode and Quick Mode negotiation and the establishment and termination of each negotiation as separate events. The IKE event category is also used for auditing user logon events in services other than IPSec, so you won’t see just IPSec events.

Logging dropped packets
IPSec is capable of adding events to the System event log when packets are filtered, as shown in Figure 9.8. The types of packet processing errors that the IPSec driver records in the System event log depend on the level of logging that is provided. IPSec driver logs can record inbound and outbound per-packet drop events during computer startup mode and operational mode. IPSec driver event logging is disabled by default, and it should not be used for extended periods. Depending on the logging level that you set, many events might be generated that will fill the System event log very
quickly.

IKE Tracing :

Some troubleshooting scenarios require a more detailed analysis than you can do by using Event Viewer. The IKE tracing log is a detailed log intended for troubleshooting IKE interoperability under controlled circumstances. Keep in mind that the details of this tracing log are not well documented and that advanced knowledge of ISAKMP RFC 2408 and IKE RFC 2409 is required to interpret this log. However, experienced IPSec administrators might find it useful. You can enable tracing for IKE negotiations if the audit failure events do not provide enough information.

To enable tracing on a computer running Windows 2000 or Windows XP, create the HKEY_LOCAL_MACHINE\System\CurrentControlSet\Services\PolicyAgent\Oakley\ EnableLogging registry value and set it to 1. Then either restart the computer or run the net stop policyagent and net start policyagent commands at the command prompt.

In Windows Server 2003, you can enable or disable the IKE tracing log dynamically while the IPSec service is running by using the Netsh commands for IPSec. To do this, open a command prompt and run the command netsh ipsec dynamic set config ikelogging 1. Alternatively, you can disable IKE tracing by running the command netsh ipsec dynamic set config ikelogging 0.

The IKE tracing log appears as the %systemroot%\Debug\Oakley.log file. A new Oakley. log file is created each time the IPSec service is started, and the previous version of the Oakley.log file is saved with the file name Oakley.log.sav. The log is limited to 50,000 lines. When the Oakley.log file becomes full, the current file is saved as Oakley. log.bak, and a new Oakley.log file is created.

Because many IKE negotiations can occur simultaneously, you should minimize the number of negotiations and enable the IKE tracing log for as briefly as possible to capture a more easily interpreted log. Use the IP addresses, SPI, timestamps, and SA identifiers to identify messages related to one security negotiation or IPSec SA processing session.

Netsh :
Netsh was first introduced in Chapter 8 as a tool for configuring IPSec policies at the command line. It can also be used to monitor and troubleshoot IPSec on computers running Windows Server 2003, however. It provides access to several key pieces of information that are not accessible by means of graphical tools. Monitoring consists of displaying policy information, getting diagnostics and logging IPSec information, or both. By running Netsh, you can find any information that you can find by running the IP Security Monitor snap-in.

To quickly get a detailed snapshot of IPSec information on a computer, run the following commands from a command prompt:

Netsh ipsec dynamic show all > ipsec.txt
Notepad ipsec.txt

These two commands will output all dynamic IPSec information to a text file and then open it in Notepad. You can, of course, view the information at a command prompt. However, the output from the command is so long that it will quickly scroll off the default command prompt.

Performance Console :

The most flexible way to monitor IPSec is to use the Performance console. The Performance console has two snap-ins: System Monitor and Performance Logs And Alerts. System Monitor allows you to monitor the real-time statistics of a wide variety of system counters by using a bar graph, a test report, or a line graph, as shown in Figure 9.9. Performance Logs And Alerts stores specified performance counters in a log file and allows you to later analyze the history of those counters by using the System Monitor snap-in. Performance Logs And Alerts can also send an e-mail message or other kind of alert when a counter reaches a specified threshold.

Network Monitor :

Network Monitor is a protocol analyzer—a type of tool more commonly referred to as a sniffer. Network Monitor is an optional component included with Windows 2000 Server and Windows Server 2003 that can capture and analyze network traffic as it is sent to and from a computer. The version of Network Monitor included for free with the Windows operating systems is a limited version of the Network Monitor tool included with Microsoft Systems Management Server (SMS). The primary limitation is that the version included with Windows will capture only traffic sent directly to and
from the co mputer it runs on. To capture traffic sent to or from other computers, you must use SMS.

The Network Monitor parser in Windows 2000 cannot interpret ESP traffic. In Windows Server 2003, the parser can interpret ESP traffic if an IPSec hardware acceleration adapter performs encryption or decryption of this traffic, or if you use ESP without encryption. Otherwise, as shown in Figure 9.10, you will only be able to see that ESP traffic is being exchanged with a remote computer. You cannot interpret the Application layer data within the ESP header because it is encrypted.

Netcap :

Netcap.exe is a command-line utility that you can use to capture network traffic to a capture file. You can then load the file in Network Monitor to view the captured traffic. You do not have to install the Network Monitor tool on the computer running Windows Server 2003 to use Netcap. You can also use Netcap on computers running Windows XP, which makes it an extremely attractive way to capture traffic for later review. The tool is available after the Windows Server 2003 Support Tools have been installed. When you first run the command, the Network Monitor driver is automatically installed.

Ping :

The favorite tool for troubleshooting network connectivity, ping, might or might not be useful for troubleshooting IPSec. First, if you use IPSec filters to block Internet Control Message Protocol (ICMP) traffic, neither ping nor Tracert will work because IPSec will filter the incoming requests. Second, ping requests do not initiate a security negotiation if you are using the default security policies. Both Server (Request Security) and Server (Require Security) explicitly permit ICMP traffic, but neither require ICMP traffic to negotiate security, If you create an IP security rule with the All ICMP Traffic filter list that uses a filter action set to Negotiate Security, and ICMP traffic is not being blocked by Internet Connection Firewall (ICF) or a firewall, ping can be a useful tool. In these cases, the ping client will show "Negotiating IP Security" during the IKE negotiation process. After negotiati on succeeds, you will see the standard ping reply messages, and the successful negotiation will be reflected in the IPSec monitoring tools.

IPSecMon :
Computers running Windows 2000 do not include the IP Security Monitor snap-in. Instead, there is a graphical tool named IP Security Monitor. To start this tool on a computer running Windows 2000, click Start, click Run, type ipsecmon, and then click OK. The Windows 2000 IP Security Monitor tool shows much of the same information as the IP Security Monitor snap-in, including a list of active SAs, and statistics such as confidential and authenticated bytes sent and the total number of bad SPI packets.
IPSecCmd :
As mentioned in Lesson 1, IPSecCmd can be used to display IPSec information at the command line on computers running Windows XP. The syntax used to view all available IPSec information is simply Ipseccmd show all. IPSecPol lacks IPSecCmd’s query mode, and, as a result, you cannot display IPSec information from the Windows 2000 command line.

Netdiag :
Netdiag.exe is a command-line tool that you can use to display IPSec information on computers running Windows 2000 and Windows XP. Netdiag is also available for Windows Server 2003, but the IPSec capabilities of Netdiag have been disabled. For Windows 2000, Netdiag is included with the Windows 2000 Support Tools that you can also download from the Internet. It is also available on the Windows XP Installation CD-ROM. You can install it by running Setup.exe from the Support\Tools folder and choosing the complete installation.

MCP 70-299 : 8 - Planning and Configuring IPSec

Lesson 2: Planning an IPSec Infrastructure

Active Directory Considerations :

For organizations with large numbers of computers that must be managed in a consistent way, it is best to distribute IPSec policies by using Group Policy objects (GPOs). Although you can assign local IPSec policies to computers that are not members of a trusted domain, distributing IPSec policies and managing IPSec policy configuration and trust relationships is much more time-consuming for computers that are not domain members. Another advantage of using Active Directory–based IPSec policy is that you can delegate permissions on the IP Security Policies On Active Directory container to enable specific administrators to manage IPSec throughout your organization.
These administrators do not necessarily need permissions to directly manage the individual computers
that will receive the IPSec policy, however. This capability is vital to organizations that divide responsibility for security tasks between various groups. To delegate permissions on the IP Security Policies container, you must use an Active Directory editing tool, such as ADSI Edit. ADSI Edit is a Windows support tool that uses the Active Directory Service Interfaces (ADSI). The Windows support tools can be installed from the \Support\Tools folder on the Windows 2000 and Windows Server
2003 operating system CDs.

Authentication for IPSec :

Peer authentication is the process of ensuring that an IPSec peer is the computer it claims to be. By using peer authentication, IPSec can determine whether to allow communications with another computer before the communication begins. You can choose from three authentication methods: Kerberos v5, public key certificates, and preshared keys.
If you have deployed a Windows 2000 or Windows Server 2003 Active Directory environment, and all hosts that will be using IPSec are part of that domain (or a member of a trusted domain), then you should use Kerberos. If you are communicating with outside organizations, and your partners use a Web-based CA, you can use public key certificates. If neither of these methods is available, you can use a preshared key.

Public key certificates authentication :

A public key infrastructure (PKI) can be used to authenticate and encrypt communications for a wide variety of applications, including Web applications, e-mail, and IPSec.
Although using public key certificates is not as convenient as using Kerberos, there are specific circumstances for which certificates are the logical choice for authentication in IPSec. Specifically, you should use public key certificates when you need to communicate privately with external business partners or other computers that do not support the Kerberos v5 authentication protocol.
IPSec’s use of certificate authentication is compatible with many different PKI architectures, and IPSec places relatively few requirements on the contents of a certificate. Typically, computers that have a common trusted root, or whose certificates can chain through a cross-certification trust relationship, can successfully use IPSec authentication. To use certificates for IPSec authentication, you define an ordered list of acceptable root CA names in the authentication method. This list controls the certificates that IPSec can select and the certificates that IPSec will select.

Preshared key authentication :

If both IPSec peers are not in the same domain and do not have access to a CA, a preshared key can be used. For example, a standalone computer on a network that does not connect to the Internet might need to use a preshared key, because neither Kerberos authentication through the computer’s domain account nor access to a CA on the Internet is available. A preshared key is a shared secret key (basically a password) that has been agreed upon by administrators who want to secure the computers’ communications by using IPSec. Administrators must manually configure their systems to use the same preshared key.
The preshared key authentication method uses symmetrical encryption to authenticate the hosts, which itself is very secure, but which requires that any two hosts communicating have been configured with a predefined password. Unfortunately, this key is not stored securely on the IPSec hosts. The authentication key is stored in plaintext format in the system registry and hex-encoded in Active Directory–based IPSec policy. If attackers can access your registry, they can find your preshared key, which would allow them to decrypt your traffic or impersonate one of the hosts. Use preshared key authentication only when no stronger method can be used.

Testing IPSec

As a rule, you should perform extensive testing before making any changes to your infrastructure. This rule certainly holds true when planning to use IPSec. IPSec has the potential to interfere with all network communications and, as a result, can break any network applications that your organization uses.
Begin testing IPSec in a lab environment. Configure computers with the client- and server-side of your critical applications, and verify that the lab is functional and accurately simulating the production environment. Your lab environment should have computers with each of the potential IPSec client operating systems, because different operating systems support different IPSec functionality. Develop performance metrics for each of your applications, and gather baseline performance data that you can use for comparison after IPSec has been implemented. Then implement IPSec policies on the lab computers.
Not all network equipment provides the same IPSec capabilities, and you should use the testing phase to determine which network devices need configuration changes or upgrades. Add firewalls, proxy servers, and routers to the lab environment to simulate the potential for those devices to interfere with IPSec communications in the production environment. If you plan to use IPSec for remote access, be sure to include a remote access client in your lab environment, and have that client connect from a typical remote network. If employees will use IPSec to connect to your internal network from home, test IPSec across a variety of commonly used home routing equipment. Test non-IPSec-enabled clients with IPSec-enabled servers. Even if you plan to deploy IPSec to every computer, there will be a transition period during which some computers will not yet have received the IPSec configuration.
After IPSec clients and network equipment have been configured in the lab environment, test the application functionality. If you identify problems, document the problems and solutions so that they can be quickly resolved if they appear in the production environment. Besides verifying that applications function, verify IPSec functionality. If you allow IPSec clients to use unsecured communications if IPSec negotiations fail, it is possible for applications to appear to be compatible with IPSec when the computers were unable to establish an IPSec session.

MCP 70-299 : 8 - Planning and Configuring IPSec

Negotiating IPSec Connections :

Unfortunately, IP was not originally designed with authentication or encryption in mind. As the internet grew and TCP/IP became the network protocol of choice, this unsecured form of communication became the standard. IPSec allows computers to continue using IP, while adding authentication and encryption.
However, most computers on IP networks today do not have IPSec enabled. As a result, computers with IPSec enabled are usually configured to politely ask remote computers to use IPSec to improve the security of the connection. If the two computers determine that they both have IPSec configured, and can agree upon a set of security standards, they can begin to use IPSec. This process is known as IPSec negotiation.

Not all IPSec negotiations are successful. Often the negotiations will fail because one of the two computers is not capable of using IPSec. Alternatively, the computers might not have the same security protocols enabled, which would mean that they wouldn’t be able to agree on a set of standards. In these cases, the computers will either revert to unprotected IP communications or determine that they will not communicate at all if they cannot use IPSec.

Internet Key Exchange (IKE) is the algorithm by which the first secure Security Association, or SA (a secure channel), is negotiated. IKE is a combination of the Internet Security Association Key Management Protocol (ISAKMP) and the Oakley Key Determination protocol and performs a two-phase negotiation: Main Mode and Quick Mode.

Main Mode
The initial long form of the IKE negotiation (Main Mode or Phase 1) performs the authentication and generates the master key material to establish an ISAKMP SA between machines. The result is referred to as an ISAKMP SA or an IKE SA. After the ISAKMP SA is established, it will remain in place for the period of time defined on the host computers—by default, it will last for 8 hours on computers running Windows. If data is actively being transferred at the end of the 8 hours, the Main Mode security association (SA) will be renegotiated automatically.
Main Mode negotiation occurs in three parts:
1. Negotiation of protection suites
2. Diffie-Hellman exchange
3. Authentication

Quick Mode
Quick Mode (also known as Phase 2) IKE negotiation establishes a secure channel between two computers to protect data. Because this phase involves the establishment of SAs that are negotiated on behalf of the IPSec service, the SAs created during Quick Mode are called the IPSec SAs. Two SAs are established, each with its own Security Parameter Index (SPI) label. One IPSec SA is used for inbound traffic, and the other is used for outbound traffic. During Quick Mode, keying material is refreshed or, if necessary, new keys are generated. A protection suite that protects specific IP traffic is also selected.
IPSec hosts will perform IKE Quick Mode negotiation on a regular basis to reduce the risk of an attacker using brute force methods to determine the keys used in the communications. Each renegotiation re-establishes two new IPSec security associations with new keys and SPIs. By default, computers running Windows will perform Quick Mode negotiation every hour (3600 seconds) or after 100 megabytes have been transferred.
Either side of the connection can start the renegotiation process. Therefore, the site that first reaches the defined session key limit will initiate renegotiation. Lesson 3 describes how to specify session key limits.
Authentication Header and ESP :IPSec can use two protocols: Authentication Header (AH) and ESP. The protocols canbe used either separately or together. AH provides data origin authentication, dataintegrity, and anti-replay protection for the entire packet, including the IP header andthe data payload carried in the packet. Naturally, AH does not provide protection forthe fields in the IP header that are allowed to change in transit, such as the hop count.AH does not encrypt data, which means it does not provide privacy. Attackers can readthe contents of packets if they can intercept them, but the packets cannot be modified.ESP is more commonly used than AH because it provides data origin authentication,data integrity, anti-replay protection, and the option of privacy. While AH and ESP canbe used together, you will use ESP alone in most circumstances. You should chooseAH over ESP only when the data and header in the packet need to be protected frommodification and authentication but not encrypted. You might do this if you have anintrusion detection system, firewall, or quality of service (QoS) router that needs toinspect the contents of the packet. Otherwise, take advantage of the privacy providedby encryption, and use ESP. If IPSec traffic must traverse a NAT server, you must useESP, because ESP is the only IPSec protocol that supports NAT-T.

IPSec in Windows :

IPSec is natively available and can be used to protect network communications for Windows 2000, Windows XP Professional, and Windows Server 2003. Additionally, a legacy client is available for Microsoft Windows NT 4.0, Windows 98, and Windows Millennium Edition (ME). You can download the legacy client from
http://www.microsoft.com /windows2000/server/evaluation/news/bulletins/l2tpclient.asp.

MCP 70-299 : Assessing and Deploying a Patch Management Infrastructure

Lesson 3: Deploying Updates on Existing Clients

Manually Applying Updates :

Microsoft distributes updates by using executable files that automatically install themselves when run. However, all Microsoft updates also support standardized commandline parameters to change the default installation behavior. Table 6.3 lists the parameters available for updates. The parameters listed in the New Parameter column can be used with updates released on or after September 17, 2003. You must use the parameters listed in the Old Parameter column for updates released prior to September 17, 2003. As of the time of this writing, new updates support the old parameters. However, backward compatibility with the old parameters might be dropped at some point, so you should always use the new parameters when possible.

Windows Update Web Site :

The quickest way to manually detect missing updates and install them on a computer is to directly access the Windows Update Web site. To update a computer with critical updates, security updates, and service packs by using Windows Update:
1. Click Start, point to All Programs, and then click Windows Update.
2. Click Scan For Updates.
3. Click Review And Install Updates.
4. Click Install Now. The updates will be downloaded and installed. You might be prompted to accept
a license agreement.
5. Restart the computer and return to step 1 until all critical updates and service packs have been installed.

Software Update Services :

SUS, a free download that can be installed on Windows 2000 Server–based and Windows Server 2003–based computers that have Internet Information Services (IIS) installed, provides administrators with a local alternative to the Microsoft Windows Update servers. Using the Automatic Updates client, computers on your network can automatically download and install updates from your SUS server.
The easiest way to install IIS is to use the Manage Your Server tool and add the Application Server role. For the purposes of installing Software Update Services, you can accept the default settings; neither Microsoft ASP.NET nor Microsoft FrontPage extensions are required. SUS will install itself into the Default Web Site, if it is available. Otherwise, SUS will create a new Web site.

Group Policy :

Group Policy objects can be configured to automatically install Windows Installer packages on computers. Service packs include a Windows Installer package, making it simple to use a Group Policy object to deploy a service pack.
Service packs, more than any other type of update, require extensive testing and pilot deployments because of the extensive changes they make. Although SUS is an excellent way to distribute frequently released security updates to a large number of client computers, you cannot use a single SUS server to stage a pilot deployment to a small number of computers in your organization. Fortunately, you can use Group Policy objects to distribute service packs directly.

After you assign the service pack package, Windows Installer installs the service pack automatically when users start their computers. Users are not presented with a choice to install the service pack. Only a network administrator or someone who is logged on to a local computer as a member of the Administrators group on that computer can remove the assigned software.
To distribute a service pack by using a Group Policy object:
1. Download the network install version of the service pack to a file server.
2. Extract the service pack files using the /x parameter. For example, to extract Service Pack 4 for Windows 2000, execute the command W2ksp4_en /x. Extract the files to a shared folder that both client computers and domain controllers can access. After the extraction completes, click OK.
3. Connect to the shared folder just as a client would. For example, if you extracted the files to the \\server\updates shared folder, map a network drive to \\server\updates. This will ensure that clients can locate the package after the GPO instructs the client to install it.
4. Create a new GPO or edit an existing GPO that you will use to distribute the service pack.
5. Using the Group Policy Object Editor snap-in, expand Computer Configuration, expand Software Settings, and then click Software Installation.
6. Right-click Software Installation, click New, and then click Package.
7. Navigate to the folder to which you extracted the service pack, and locate the Update.msi file. Though future service packs might place this file in a different location, recent service packs have stored it in the i386\update\ directory. Click the Update.msi file, and then click Open.
8. In the Deploy Software dialog box, click Assigned, and then click OK.

After a package has been added to the Software Installation node of a GPO, you can choose to remove or deploy it for troubleshooting purposes. If a service pack installation fails to deploy successfully, you can redeploy it by right-clicking the package, clicking All Tasks, and then clicking Redeploy Application.

MCP 70-299 : Assessing and Deploying a Patch Management Infrastructure

Lesson 2: Deploying Updates on New Clients
Security Considerations :


Computers are under attack from the moment they connect to the Internet. Worms and viruses are constantly active, probing every IP address for vulnerabilities. Microsoft Windows Server 2003 is much more resilient to attacks that might occur during the installation process than earlier versions of Windows because it adheres to the “secure by default” ideal. However, vulnerabilities have been discovered in unpatched computers running Windows Server 2003, and these vulnerabilities might be exploited during the setup process.
Although it is possible to update and secure a computer running Windows so that it can be connected directly to the Internet without becoming infected by a worm or a virus, a computer does not have the benefit of updates or security hardening during the installation process. If you attempt to install Windows on a computer while it is connected to the Internet, there is a high probability that it will be attacked, and possibly exploited.

Integrated Installation :

You can apply service packs, but not necessarily other types of updates, directly to Windows 2000, Windows XP, and Windows Server 2003 installation files. The process of integrating a service pack into the original setup files for an operating system is called slipstreaming. Slipstreaming creates an integrated installation—including the latest service pack—that can be used when installing the operating system on new computers. Using this process improves the security of new computers, and reduces the time required to apply updates after completing the initial installation. You can either perform the installation from a shared folder or create a CD with the integrated setup files.
Because the integrated installation replaces individual files, the space requirements for this installation type are almost identical to the space requirements for the base operating system. After you slipstream a service pack into the operating system setup files, you cannot remove the service pack.

Lesson Summary :

■ Computers should not be connected to the Internet or even to a private network with other hosts, until after the operating system and all updates have been installed.
■ Computers can be built while connected to the network if you create an isolated network segment with a minimal number of trusted computers that have been scanned for worms, viruses, and other malicious software.
■ You can reduce the time required to install new updates by slipstreaming a service pack into operating system installation files and configuring other updates to be automatically applied.

3 - Hardening Computers for Specific Roles :

Lesson 1: Tuning Security for Client Roles :

Planning Managed Client Computers :


When planning the requirements for managed client computers, start by identifying the baseline security level that is appropriate for users to have on their computers. The baseline user security level is specified by granting users membership to one of these groups: Users, Power Users, and Administrators. Membership in the Users group gives the most protection from a number of external threats, such as viruses, and it limits the damage that users can accidentally or intentionally cause to their computers. However, user level permissions have the most incompatibility problems with older applications. Take particular care before you give users privileged access to computers that they
share with other employees.
Next, identify the types of systems users need to interoperate with. Interoperability with earlier systems, such as Microsoft Windows NT 4.0–based servers and UNIX file servers, necessitates that some of the security you might use in a pure Windows Server 2003 environment must be relaxed.
Finally, consider the level of support users provide for their own computers. Users who use portable computers and provide their own support might require administrator rights on their computers. Other high-performance users, such as developers, might also need administrative rights.
Software Restriction Policies :

Software restriction policies are a feature in Windows XP and Windows Server 2003 that can be used to regulate unknown or untrusted software. Businesses that do not use software restriction policies put the burden of identifying safe and unsafe software on the users. Users who access the Internet must constantly make decisions about running unknown software. Malicious users intentionally disguise viruses and Trojans to trick users into running them. It is difficult for users to make safe choices about what software they should run.
With software restriction policies, you can protect your network from untrusted software by identifying and specifying the software that is allowed to run. You can define a default security level of Unrestricted or Disallowed for a Group Policy object (GPO) so that software is either allowed or not allowed to run by default. You can make exceptions to this default security level by creating software restriction policy rules for specific software. For example, if the default security level is set to Disallowed, you can create rules that allow specific software to run.

Security for Desktop Computers :

When a computer manufacturer delivers a new computer to an organization, the operating system is generally configured to provide the greatest flexibility to the typical user. Many organizations have additional software installed on top of the operating system, such as Microsoft Office. This provides power users with the tools they need to do their jobs.
However, many types of employees do not require much flexibility and will actually be more productive if the software on their computers is restricted. For example, a user in the accounts payable department might only need access to an e-mail client, accounting software, and a Web browser. For this type of user, restricting the applications they can run can make them more productive (for example, by removing Solitaire). Additionally, it can reduce the risk of malicious software, such as viruses and Trojans, infecting the computer.
In a typical restricted desktop computer role, the desktop and Start menu are significantly simplified. Users cannot make extensive customizations, other than a limited number of application-specific settings. Applications are typically allocated to users based on their job roles, and users cannot add or remove applications. This type of desktop configuration is appropriate in a marketing or finance department, for example.
In these areas, users require only a specific and limited set (typically three to five) of productivity and in-house applications to do their jobs.

Security for Mobile Computers :

Mobile computers require that you attend to several additional security considerations beyond those of desktop computers. Mobile users might use their computers while traveling, which might require them to perform administrative tasks that a member of the IT group would normally perform. For example, a mobile user might need to print a document using a different printer than the one installed in the office, and would need to install the correct printer driver. To allow this, disable the Devices: Prevent Users From Installing Printer Drivers security option. If you anticipate that users who work away from the office will need to install or reinstall applications while working remotely, you might want to enable the Always Install With Elevated Privileges setting in the Administrative Templates\Windows Components\Windows Installer node.
Mobile users might connect to foreign networks, such as a wireless hotspot at a coffee shop. These foreign networks won’t have the benefit of your organization’s network security, so mobile users have an elevated risk of being attacked across the network. To mitigate this risk, enable the Internet Connection Firewall (ICF, known in Service Pack 2 as Windows Firewall) on all network interfaces for mobile computers. Unfortunately, ICF cannot be configured by using Group Policy settings. Lesson 2 in this chapter contains more information about firewalls.

Lesson Summary

■ Software restriction policies can be applied to a GPO to restrict the applications that can run on a target system. Software restriction policies can restrict applications based on a hash of the executable file, the path in the file system, a certificate associated with the application, or the Internet zone from which the application is running.
■ You should create security templates for the various computer roles in your organizations, including desktop computers, mobile computers, and kiosks. Whenever possible, you should base these templates on a predefined security template.
■ Security templates are useful for creating GPOs, but they contain only a subset of the settings available when configuring a GPO. Therefore, after importing a security template into a GPO, you might have to use the Group Policy Object Editor to specify additional settings.
■ Mobile computers have different security considerations than desktop computers. Mobile computers are subject to a wider array of network attacks because they might connect to unprotected networks. Additionally, they are more likely to be stolen, so encryption of the disk’s physical contents might be necessary.
■ Kiosks require security settings that are tightly restricted to prevent abuse. GPOs allow an administrator to remove all major user interface elements and configure kiosk computers to log on a user and launch a single application automatically at startup.

MCP 70-299 : Planning and Configuring an Authentication Strategy

Lesson 1: Understanding the Components of an Authentication Model :

The Difference Between Authentication and Authorization :


The two processes are closely related and often confused. To understand the difference between authentication and authorization, consider an example in the physical world that most people are familiar with: boarding an airplane. Before you can board a plane, you must present both your identification and your ticket. Your identification, typically a driver’s license or a passport, enables the airport staff to determine who you are. Validating your identity is the authentication part of the boarding process. The airport staff also checks your ticket to make sure that the flight you are boarding is the correct one. Verifying that you are allowed to board the plane is the authorization process.
Storing User Credentials :

The server that authenticates the user must be able to determine that the user’s credentials are valid. To do this, the server must store information that can be used to verify the user’s credentials. How and where this information is stored are important decisions to make when designing an authentication model.
Lesson Summary :

■ Authentication is the process of proving your identity. In Windows networks, users frequently authenticate themselves using a user name and password pair. How the user name and password are communicated across the network has changed with different versions of Windows.
■ Earlier versions of Windows use LM authentication, which is still supported by Windows Server 2003 for backward compatibility but carries with it potential security vulnerabilities. LM authentication should be disabled whenever compatibility with Windows 95 or Windows 98 is not required.
■ If LM authentication cannot be disabled, the storage of the LMHash can be avoided for specific user accounts by using passwords greater than 14 characters or passwords that contain special ALT characters.
■ Newer versions of Windows use NTLMv1, NTLMv2, or Kerberos authentication. The Kerberos protocol is designed to be more secure and scalable than NTLM authentication.
■ Local passwords are stored and maintained by the Local Security Authority (LSA). The LSA is responsible for managing local security policies, authenticating users, creating access tokens, and controlling audit policies.
■ Windows Server 2003 and the Resource Kit include the Kerbtray.exe, Klist.exe, and CmdKey.exe tools for troubleshooting Kerberos authentication problems.
Lesson 2: Planning and Implementing an Authentication Strategy :

Considerations for Evaluating Your Environment :

When evaluating your environment, identify the following:

■ The number of domain controllers in your organization. Ensure that there are enough domain controllers to support client logon requests and authentication requests while meeting your redundancy requirements.

■ The type of network connectivity between site locations in your organization. Ensure that clients in remote sites are connected well enough to authenticate to domain controllers located in main sites.

■ The number of certification authorities (CAs) that are available in your organiza tion and their locations. Ensure that you have enough CAs to support the anticipated number of certificate requests.

What is a strong password?

A strong password is one that can be remembered by the user but that is also complex enough to be difficult to guess. For example, *&_I5y#<.h may appear to be a good password, but the user might be forced to write it down in order to remember it, creating a significant security vulnerability. Fortunately, there are techniques for creating strong passwords that the human brain can remember.

an easy-to-remember suffix to it to make it more secure: 99Butterflies@complexpass word.com. You now have a password that is 33 characters long, uses uppercase, lowercase, and symbols, is easy to remember, and that, because of the length, is harder than the *&_I5y#<.h password to crack.

Strong password policy :

When implementing and enforcing a password policy, consider the users’ inability to remember passwords that are too complex, change too often, and are too long. When passwords are too complex or too long, the eventuality that users will use other methods to remember their passwords, such as writing them down, is more likely.

Password Complexity is enforced by default in the Windows Server 2003 environment. The Password Complexity feature requires that passwords:
■ Do not contain all or part of the user’s account name.
■ Be at least six characters in length.
■ Contain characters from three of the following four categories:
❑ Uppercase characters (A through Z)
❑ Lowercase characters (a through z)
❑ Base 10 digits (0 through 9)
❑ Non-alphabetic characters (for example, !, $, #, %).

Windows 2003 Authentication Methods for Earlier Operating Systems :

Authentication protocols have improved over time and will continue to improve in the future. As a result, earlier operating systems support fewer and less secure authentication protocols than newer operating systems. By default, computers running Windows Server 2003 can accept all types of authentication protocols, including LM, NTLMv2, and Kerberos, to ensure compatibility with earlier operating systems. If your organization does not require this backward compatibility, you can you can configure security policy to support only the more secure protocols, such as NTLMv2 and Kerberos.

The Network Security LAN Manager Authentication Level policy defines which authentication protocols a computer sends and accepts. This policy is contained within the Local Policies\Security Options security policy node. Table 1.6 describes the options for this policy setting. The policy settings are listed in order from least to most secure. Increasing the security of this policy reduces compatibility with earlier clients and servers.
Enabling secure authentication for domain controllers :

To configure domain controllers to reject LM authentication:

1. On a domain controller, click Start, click Administrative Tools, and then click Domain Controller Security Policy.
2. Expand Local Policies and then select Security Options
3. Double-click Network Security: LAN Manager Authentication Level. The Network Security: LAN Manager Authentication Level Properties dialog box appears.
4. Select the Define This Policy Setting check box, if it is not already selected.
5. Select Send NTLMv2 Response Only\Refuse LM, and then click OK.
6. Close the Default Domain Controller Security Settings console.
7. Click Start, and then click Run. Type gpupdate.exe, and click OK. This causes the policy to take effect on the local domain controller immediately.

Lesson Summary :

■ Use security policy settings to configure authentication requirements.
■ Implement a strong password policy in your organization to reduce the likelihood that your users’ credentials will be compromised.
■ Although you can enforce complex passwords by using security policy in Windows Server 2003 Active Directory, employee education is the only way to keep users from writing down passwords or using discoverable personal information in passwords.
■ An account lockout policy prevents malicious attackers from logging on by continually guessing passwords; however, it enables malicious attackers to perform a denial-of-service attack that denies valid users from successful authentication.
■ Kerberos ticket lifetimes must be short enough to prevent attackers from cracking the cryptography that protects the ticket’s stored credentials, but long enough to minimize the number of tickets that clients request.
■ Use delegated authentication and constrained delegation as strategies for implementing supplemental authentication where required.
■ Any application that has the Certified for Windows Server 2003 logo has been tested to ensure that it will function in environments that require multifactor authentication.

Lesson 3: Configuring Authentication for Web Users :

Configuring Anonymous Access for Web Users :

Most public Web sites on the Internet allow anonymous access for at least a portion of the site. In other words, the general public can retrieve pages from the Web server without providing credentials. This does not mean that authentication is not taking place, however. Any user or process that accesses a file or other network resource must do so in the context of a security principal (a user, a computer, or a service account). When Internet Information Services (IIS) accesses files to be sent to an anonymous user, it uses a specified user account to access those files. When anonymous access is not allowed, users must provide their own credentials.

Configuring Web Authentication :

This chapter has already described three authentication protocols: LM, NTLM, and Kerberos.
However, none of these protocols can be used by a Web browser to authenticate a user to a Web server because Web browsers and Web servers can use only Hypertext Transfer Protocol (HTTP) to communicate. Web browsers must authenticate to Web servers using an authentication protocol that is contained within HTTP. Administrators configuring an IIS server have several authentication options that differ in how they pass the credentials to IIS and which browsers support them:

■ Basic Authentication. Selecting this option enables browsers to submit the user’s password in an encoded format that is equivalent to clear text. If the authentication traffic is intercepted, an attacker could easily determine the user’s password.
While this authentication method is vulnerable to being intercepted, it is supported by a wide range of browsers.
■ Digest Authentication For Windows Domain Servers. Selecting this option allows the Web browser to submit the user’s password in an MD5 hash. If digest authentication traffic is intercepted, an attacker would be able to easily determine the user’s password.
■ Integrated Windows Authentication. Selecting this option enables Kerberos v5 authentication and NTLM authentication within the Web requests. This allows the Web browser to send the user’s password in the form of a hash without requiring the user’s password to be stored using reversible encryption.
■ .NET Passport Authentication. Select this option if your organization is using the .NET Passport service for authentication. .NET Passport provides a central authentication service that many different organizations can use and allows users to authenticate themselves to many different, unrelated Web sites.

Préparation MCP 70-270 : Implémentation de Windows XP Professionnel

1. Planification de l'installation de Microsoft Windows XP Professionnel :

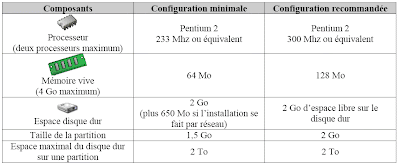
Vérification de la configuration système :


configuration XP pro
Identification des options de partitionnement :

Il est possible de créer à partir d'un seul disque dur, des partitions qui se présenterons comme des disques durs à part entière. Comme précisé plus haut, il est impératif de prévoir au moins 1,5 Go pour l'installation de Windows XP Professionnel. En fonction de l'état du disque hôte, et des partitions qui s'y trouvent, le menu d'installation de Windows XP Professionnel peut proposer les choix ci-dessous :
- Création d’une partition sur un disque non partitionné
- Création d’une nouvelle partition sur un disque déjà partitionné
- Installation sur une partition existante
- Suppression d’une partition


Mise à niveau vers Windows XP Professionnel :

Il est également possible de faire une mise à jour de votre version de Windows actuelle vers Windows XP. Cependant, seuls les systèmes suivants peuvent être mis à jour directement :
- Microsoft Windows 98
- Microsoft Windows Me
- Microsoft Windows NT4 SP5
- Microsoft Windows 2000 Professionnel


2. Automatisation de l’installation de Windows XP Professionnel :

Dans le cadre d'une installation de Windows XP Professionnel sur un nombre important de machines, il est préférable d'utiliser le processus d'automatisation d'installation. Cela se fait grâce à deux fichiers :
- Fichier de réponse
- Fichier UDF
Le premier fichier stocke toutes les informations qui seront communes aux installations (Domaine, options réionales, etc…) Le second fichier va lui stocker les informations spéifiques àchaque ordinateur (nom de l'ordinateur, configuration TCP/IP, etc…) Il faudra ensuite lancer l'installation en indiquant l'emplacement réeau de ces deux fichiers. Aucune intervention de la part de l'utilisateur ne sera ainsi requise pendant le processus d'installation.

Service d’installation à distance :

Le service RIS (Remote Installation Service) est un service de déploiement intégré à Active Directory permettant de déployer Windows XP Professionnel sans intervention de l'utilisateur. Ce service peut être utilisé sans pour autant savoir où se trouve l'iimage du système. Pour lancer le processus d'iinstallation, il suffit de taper F12 au démarrage des ordinateurs équipés de cartes réseaux compatibles PXE (pouvant démarrer à partir du réseau). Pour les machines n'étant pas équipées d'une carte réseau à la norme PXE, il suffit de créer une disquette de démarrage en exécutant rbfg.exe situé dans Sytem32\Reminst. Trois services doivent être présents sur le réseau en plus du service RIS pour envisager cette méthode de déploiement :
- Service DHCP (pour attribuer des adresses IP aux ordinateurs clients)
- Service DNS (pour localiser les serveurs)
- Serveur exécutant Active Directory (pour localiser le serveur RIS)

3- Configuration du matériel sur un ordinateur exécutant Windows XP Professionnel :

Installation et configuration de périphériques matériels :

Avant de débuter l'installation d'un nouveau périphérique sous Windows XP Professionnel, il est impératif de vérifier que celui-ci se trouve bien dans la dernière version de la HCL (Hardware Compatibility List).

S'il s'agit d'un périphérique Plug-and-Play, l'installation sera facilitée car Windows XP le détectera automatiquement, l'installera et le configurera.

Dans le cas d'un périphérique non Plug-and-Play, celui-ci nécessitera un pilote fourni par le fabriquant, qu'il faudra fournir à Windows XP Professionnel pendant la procédure d'installation.

Il est également important de noter qu'il faut disposer des droits d'administrateur pour installer un nouveau périphérique (sauf pour l'installation d'une imprimante locale). Il est possible de visualiser la liste des périphériques qui sont installés sur Windows XP Professionnel grâce au gestionnaire de périphériques.

Cet outil est accessible en faisant un clic droit sur le poste de travail, puis en sélectionnant Propriétés / Gestionnaire de périphériques. A partir du gestionnaire de périphériques, il est possible de supprimer, désactiver, mettre à jour tous les périphériques. Il suffit pour cela de faire un clic droit sur le périphérique en question, puis de faire son choix dans le menu contextuel qui apparaît.

Le plus souvent, les imprimantes étant des périphériques Plug-and-Play, leur installation est automatique dès leur connexion. Cependant, il est possible d „exécuter cette opération manuellement (si par exemple l'utilisateur désire utiliser un autre pilote que celui fournit par Microsoft). Pour se faire, il suffit d'ouvrir le panneau de configuration, puis de cliquer sur Imprimante et autres périphériques, puis sur Imprimantes et télécopieurs. Ensuite sous tâches d'impression, il faut cliquer sur Ajouter une imprimante et suivre les instructions.

Configuration de Microsoft Windows XP Professionnel pour fonctionner sur des réseaux Microsoft :

Etude des groupes de travail et des comptes d’utilisateur :

Un groupe de travail est un ensemble d'ordinateur connecté à un réseau qui partage des ressources. Chacun des comptes utilisateur voulant accéder aux ressources du réseau devra être recréer sur chacune des machines auxquels il voudra accéder (ex : 3 utilisateurs pour 3 machines = 9 comptes à créer ou 50 utilisateurs pour 50 machines = 2500).

Ce type de structure est envisageable dans le cas d'une petite entreprise ayant peu d'ordinateur mis en réseau. Cela évite de mettre en place un serveur.

On distingue trois types de compte utilisateur :
- Compte d’utilisateur local : Permet d’ouvrir une session localement sur un ordinateur. Il est stocké dans la base SAM de l’ordinateur.
- Compte d’utilisateur de domaine : Permet d’ouvrir une session sur le domaine, et par conséquent d’accéder aux ressources de ce dernier.Il est stocké dans l’annuaire Active Directory.
- Compte d’utilisateur prédéfini : Administrateur et Invité, on ne peut pas supprimer ces comptes. Le compte invité est désactivé par défaut. La compte Administrateur et les seul compte par défaut qui à TOUT les droits d’administration et de gestion sur l’ordinateur.

Création et authentification de comptes d’utilisateur locaux :

Pour créer un compte d'utilisateur local, il faut passer par la fenêtre Gérer (disponible via le menu contextuel du Poste de travail), puis choisir l'option Utilisateur et groupes locaux, puis choisir l'option Nouvel utilisateur en faisant un clic droit sur Utilisateur.

Il s'agit après d'entrer les informations relatives à cet utilisateur. Une fois le compte utilisateur créer, il faut savoir qu'il aura des droits limités, cela signifie que l'utilisateur qui utilisera ce compte pour se connecter à l'ordinateur ne pourra pas effectuer des taches administratives comme par exemple installer un nouveau pilote pour un périphérique.

La méthode la plus facile pour changer le rang du compte utilisateur consiste à passer par le Panneau de configuration et d'entrer dans le menu Compte d’utilisateurs, puis sélectionner le compte que l'on veux modifier, cliquer sur Propriété, choisir l'onglet Appartenance au groupe et enfin choisir le niveau daccès de l'utilisateur. Notez qu'il y a trois options et non deux (Administrateur, et limité). La dernière option, Autre, permet de personnaliser le niveau d'accès du compte en l'affectant à un groupe ayant des niveaux d'accès bien particuliers.

Il est important de comprendre que l'une des plus grandes caractéristiques d'un groupe de travail est l'authentification qui se fait à un niveau local. C'est-à-dire que c'est la machine où l'utilisateur se connecte qui validera ou non l'ouverture de session. Si celle-ci abouti, l'utilisateur obtiendra un jeton d’accès qui constituera l'indentification de l'utilisateur pour cet ordinateur local et contient les paramètres de sécurité de l'utilisateur (ex : la liste des groupes auxquels il appartient).

Module 8 : Maintenance des logiciels à l’aide des services SUS

Introduction :

En règle générale, les administrateurs système assurent la mise à jour des systèmes en procédant à une vérification fréquente des mises à jour de logiciels sur le site Web Windows Update ou le site de sécurité Microsoft. Ils téléchargent manuellement les mises à jour disponibles, les testent dans leur environnement, puis les distribuent manuellement ou à l’aide de leurs outils traditionnels de distribution de logiciels.

Les services SUS permettent aux administrateurs d’effectuer ces tâches automatiquement.

Procédures 1 : côté serveur :

1. Le serveur exécutant les services SUS effectue une synchronisation planifiée avec Windows Update et reçoit de nouveaux packages de mises à jour.
2. L’administrateur système examine les nouveaux packages et détermine s’ils nécessitent un test.
a. Si un test est requis, l’administrateur envoie les nouveaux packages pour qu’ils soient testés.
b. Si aucun test n’est requis, l’administrateur passe à l’étape 3.
3. L’administrateur approuve les nouveaux packages de mises à jour.


Procédures 2 : côté client :

1. La fonctionnalité Mises à jour automatiques installée sur les ordinateurs clients vérifie quotidiennement le serveur exécutant les services SUS et télécharge les nouveaux packages de mises à jour approuvées, à partir du serveur exécutant les services SUS ou depuis le site Web Windows Update.
2. À l’heure de mise à jour planifiée, les services SUS vérifient si l’administrateur est connecté.
a. Si l’administrateur est connecté, une bulle d’état s’affiche sur son bureau et il peut décider de reporter ou d’exécuter l’installation.
b. S’il n’est pas connecté, le programme effectue l’étape 6.
3. Le travail d’installation planifié commence et la fonctionnalité Mises à jour automatiques installe les packages nouveaux ou modifiés.
4. La fonctionnalité Mises à jour automatiques vérifie si les nouveaux packages nécessitent un redémarrage du serveur ou du client.
a. Si un redémarrage est requis, le système redémarre après l’installation de tous les packages.
b. Si aucun redémarrage n’est requis, l’installation est terminée.
5. La fonctionnalité Mises à jour automatiques attend la prochaine vérification planifiée.


Procédure 3 : configuration des services SUS à l’aide des paramètres par défaut :

Pour configurer les services SUS :

1. Téléchargez les services SUS à l’adresse http://www.microsoft.com/windows2000/windowsupdate/sus/default.asp.
2. Double-cliquez sur le fichier SUS10SP1.exe pour commencer la procédure d’installation.
3. Dans la page Welcome de l’Assistant Installation, cliquez sur Next.
4. Lisez et acceptez le End User License Agreement.
5. Cochez la case Typical.
6. Dans l’Assistant Installation, cliquez sur Install, puis sur Finish pour ouvrir le site Web d’administration des services SUS dans Internet Explorer.


Procédure 4 :

Pour créer un objet Stratégie de groupe pour les mises à jour automatiques d’une unité d’organisation, en utilisant le nom de l’ordinateur de votre classe, à titre d’exemple :

1. Dans le menu Démarrer, pointez sur Outils d’administration, puis cliquez sur Gestion des stratégies de groupe.
2. Dans l’arborescence de la console, développez Gestion des stratégies de groupe, Forêt : nwtraders.msft, Domaines, nwtraders.msft et Locations, puis cliquez sur London.
3. Cliquez avec le bouton droit sur London, puis sur Créer et lier un objet de stratégie de groupe ici.
4. Dans la boîte de dialogue Nouvel objet GPO, tapez London SUS Automatic Updates, puis cliquez sur OK.
5. Cliquez avec le bouton droit sur London SUS Automatic Updates, puis cliquez sur Modifier.
6. Sous Configuration ordinateur, développez successivement Modèles d’administration et Composants Windows, puis cliquez sur Windows Update.
7. Dans le volet des informations, double-cliquez sur Configuration du service Mises à jour automatiques.
8. Dans la boîte de dialogue Propriétés de Configuration du service Mises à jour automatiques, cliquez sur Activé, puis sur Paramètre suivant.
9. Dans la boîte de dialogue Propriétés de Spécifier l’emplacement intranet du service de Mise à jour Microsoft, cliquez sur Activé.

10. Dans la zone Configurer le service intranet de Mise à jour pour la détection des mises à jour, tapez http://NomOrdinateur (NomOrdinateur étant ici le nom de votre ordinateur).
11. Dans la zone Configurer le serveur intranet de statistiques, tapez
http://NomOrdinateur (NomOrdinateur étant ici le nom de votre ordinateur).
12. Fermez successivement la boîte de dialogue Éditeur d’objets de stratégie de groupe, puis la fenêtre Gestion des stratégies de groupe.


Procédure 5 : sauvegarde des services SUS :

Pour sauvegarder les services SUS à l’aide de ntbackup :

1. Dans la boîte de dialogue Exécuter, tapez ntbackup, puis cliquez sur OK.
2. Dans la page Assistant Sauvegarde ou Restauration, cliquez sur mode avancé.
3. Dans la fenêtre intitulée Utilitaire de sauvegarde, cliquez sur l’onglet Sauvegarder.
4. Développez Disque local (C:), puis cochez la case Inetpub.
5. Développez successivement Windows, system32 et inetsrv, puis cochez la case MetaBack.
6. Dans la zone Nom du fichier ou média de sauvegarde, spécifiez le nom du fichier de sauvegarde, puis cliquez sur Démarrer.
7. Dans la boîte de dialogue Informations sur la sauvegarde, cliquez sur Démarrer la sauvegarde.
8. Une fois la sauvegarde terminée, cliquez sur Fermer.

Module 6 : Gestion du stockage des données

Procédure 1 : utilisation de la compression des fichiers NTFS :
Pour compresser des fichiers ou des dossiers sur un disque NTFS via la compression des fichiers NTFS :

1. Dans l'Explorateur Windows, cliquez avec le bouton droit sur le fichier ou le dossier à compresser, puis cliquez sur Propriétés.
2. Dans la boîte de dialogue des Propriétés, sous l'onglet Général, cliquez sur Avancé, activez la case à cocher Compresser le contenu pour minimiser l'espace disque nécessaire, puis cliquez sur OK.
3. Dans la boîte de dialogue Propriétés, cliquez sur OK.
4. Dans la boîte de dialogue Confirmation des modifications d'attributs, cliquez sur OK.


Procédure 2 : utilisation de la fonction Dossiers compressés :

Pour compresser des fichiers ou des dossiers via la fonction Dossiers
compressés :


1. Dans le volet des informations de l'Explorateur Windows, cliquez avec le bouton droit sur une zone vide, cliquez sur Nouveau, puis sur Dossier compressé.
2. Déplacez ou copiez les fichiers dans le nouveau dossier pour les compresser.


Procédure 3 : cryptage d'un fichier :

Pour crypter un fichier ou un dossier en utilisant l'Explorateur Windows :

1. Cliquez avec le bouton droit sur le fichier ou le dossier à crypter, puis cliquez sur Propriétés.
2. Dans la boîte de dialogue des Propriétés, sous l'onglet Général, cliquez sur Avancé.
3. Dans la boîte de dialogue Attributs avancés, activez la case à cocher Crypter le contenu pour sécuriser les données.
4. Le texte du fichier change de couleur, indiquant l'état crypté du fichier.

Procédure 4 : Ajout d'une entrée de quota de disque :

Pour ajouter une entrée de quota de disque :

1. Dans l'Explorateur Windows, cliquez avec le bouton droit sur le volume dans lequel vous souhaitez ajouter une entrée de quota de disque, puis cliquez sur Propriétés.
2. Dans la boîte de dialogue des Propriétés, sous l'onglet Quota, cliquez sur Entrées de quota.
3. Dans la fenêtre qui s'affiche, dans le menu Quota, cliquez sur Nouvelle entrée de quota.
4. Dans la boîte de dialogue Sélectionnez Utilisateurs, dans la zone Entrez les noms des objets à sélectionner, tapez le nom de domaine ou de groupe de travail, suivi d'une barre oblique inverse (\) et du nom de l'utilisateur donvous voulez imposer les quotas, puis cliquez sur OK.
5. Dans la boîte de dialogue Ajout d'une nouvelle entrée de quota, indiquez l'une des options suivantes :
a. Ne pas limiter l'espace disque
b. Limiter l'espace disque à

Google