Affichage des articles dont le libellé est Microsoft. Afficher tous les articles

Installing and Configuring the Firewall Client

How to Install Firewall Client :
When you install ISA Server, you have the option of installing the Firewall Client Share on the ISA Server computer. When you choose this option, the Firewall Client installation files are copied to the server in the C:\Program Files\Microsoft ISA Server\Clients folder. The folder is then shared with a share name of Mspclnt. Moreover, the system policy rule that enables access to the shared folder is enabled. To install the Firewall Client manually, users can connect to the share and run the setup program.
To install the Firewall Client software from a shared folder, use the following procedure:

1. Connect to the shared folder that contains the Firewall Client installation files. If you use the shared folder on the ISA Server computer, the default share name is ISA_Server_name/MSPClnt.
2. Right-click MS_FPC.msi and click Install. Alternatively, you can double-click Setup.exe.
3. On the Welcome To The Install Wizard For The Microsoft Firewall Client page, click Next.
4. On the Destination Folder page, review the default installation folder location.Click Change if you want to change the installation folder. Click Next to continue.
5. On the ISA Server Computer Select screen, you can select how the Firewall Client will locate the ISA Server. To configure the server name or IP Address manually, select Connect To This ISA Server and type the ISA Server name or the IP address. To enable Automatic Discovery of the ISA Server computer, select Automatically Detect The Appropriate ISA Server Computer. Click Next.
6. On the Ready to Install the Program page, click Install.
7. When the installation wizard finishes, click
Finish.

After the installation is complete, the Firewall Client application is enabled. The Microsoft Firewall Client Management icon is added to the system tray. To modify the Firewall Client configuration on the client, right-click the icon and click Configure. On the General tab ,you can enable or disable the Firewall Client and configure it to detect the ISA Server computer automatically or configure the ISA
Server computer manually. On the Web Browser tab, you can enable or disable automatic configuration of the Web browser.

How to Automate Firewall Client Installation :
If you deploy the Firewall Client to a large number of clients, you may choose to automate the Firewall Client installation. You have several options for automating the installation of the Firewall Client. You can perform an unattended installation, use Group Policy in Active Directory, or Microsoft Systems Management Server (SMS) to automate the installation.

Performing an Unattended Installation of the Firewall Client
One option for automating the deployment of the Firewall Client is to perform an unattended installation. To perform an unattended installation, you must ensure that the Firewall Client installation files are accessible from the client computer and then run the setup program from a command prompt with the appropriate parameters.
To complete an unattended installation of Firewall Client when running the setup program from the command prompt, use the following syntax:
Path\Setup.exe /v" [SERVER_NAME_OR_IP=ISA_Server_Name] [ENABLE_AUTO_DETECT={10}] [REFRESH_WEB_PROXY={10}] /qn"

Using Active Directory Group Policy to Distribute the Firewall Client
You can also use the Software Installation option in Active Directory Group Policy to automate the installation of the Firewall Client. To distribute the Firewall Client using this option, perform the following procedure:
1. Copy the Firewall Client installation files to a network share. You can use the Firewall Installation share on the ISA Server computer or on a file server. If you are installing the Firewall Client on a large number of client computers, use a separate file server.
2. Determine whether you wish to distribute the client software to users or computers. If you distribute the software to users, you can choose whether the software will be installed the next time the user logs on or whether the user can initiate the installation from Add/Remove Programs. If you distribute the software to computers, the software will be installed the next time the computer restarts.
3. Create a new software distribution package. Configure the software distribution package to use the installation files on the shared folder. You can also configure the distribution options for the software package.
4. When users log on or the client computers reboot, the Firewall Client is installed. The Firewall Client will then automatically discover the ISA Server computer and download the configuration information.

Securing and Maintaining ISA Server 2004

Lesson 1: Securing ISA Server 2004

Securing the computer running ISA Server is vital to ensuring your organization’s security. To secure the ISA Server computer, ensure the security of the computer itself, the operating system running on the computer, and the ISA Server configuration. After installation, ISA Server starts with a default configuration that blocks all traffic between networks connected to ISA Server but enables some traffic between the ISA Server computer and other networks. As an ISA Server administrator, you will need to modify the default configuration. The third step in ensuring ISA Server security is to manage the administrative permissions users have on ISA Server.

How to Harden the Server :

ISA Server runs on computers running Microsoft Windows 2000 Server or Windows Server 2003, so the first step of securing ISA Server is to ensure that the computer and operating system are as secure as possible. Securing the computer includes the following components:
1 - Securing the network interfaces
2 - Ensuring that only required system services are enabled
3 - Ensuring that security updates are applied.

How to Secure the Network Interfaces
To secure ISA Server, begin by securing the network interfaces connected to the server.By default, network interfaces in both Windows 2000 Server and Windows Server 2003are configured to facilitate connecting other computers on the network to the server.On an ISA Server computer, ensure that clients can connect to the network interfacesonly to access specific resources. Although both the interface connected to the Internetand the interface connected to the Internal network need to be secured, it is particularly important to secure the interface that is connected to the Internet.

Securing the External Network Interface
The external interface of your ISA Server computer is likely to be directly attached to the Internet, where it may be exposed to an attack from anywhere on the Internet. To secure the external interface on the ISA Server computer, complete the following actions:

1- Disable File and Printer Sharing for Microsoft Networks and Client for Microsoft Networks. File and Printer Sharing for Microsoft Networks allows the machine to share Server Message Block/Common Internet File System (SMB/CIFS) resources. The Client for Microsoft Networks allows the machine to access SMB/CIFS resources. These options can enable NetBIOS and Direct Hosting ports, both of which are used for conventional file sharing and access on Microsoft networks.
2- Disable NetBIOS over TCP/IP. NetBIOS over TCP/IP is required if the computer needs to be configured as a Windows Internet Naming Service (WINS) client,needs to send out NetBIOS broadcasts, needs to send out browser service announcements, or needs to access NetBIOS resources. The ISA Server computer should not send or receive any NetBIOS packets to the Internet.
3- Disable the LMHOSTS Lookup option. The LMHOSTS file is used to enable NetBIOS name lookups. The ISA Server computer should not connect to any computers on the Internet using NetBIOS. If you disable LMHOSTS lookup, be aware that this option is disabled for all network interfaces on the ISA Server computer.
4- Disable automatic Domain Name System (DNS) name registration. By default, Windows 2000 and Windows Server 2003 computers attempt to register their IP addresses with a DNS server. The ISA Server computer should not register the IP address for its external interface with DNS servers on the Internet or with DNS servers inside the network.

Securing the Internal Network Interface
In addition to securing the external interface,you should secure the internal interface on the computer running ISA Server.However, in many cases, you may require more functionality on the internal interface,so you must ensure that you disable only the components that are not required.
■ Leave File and Printer Sharing for Microsoft Networks enabled on the internal interface if you want internal network clients to access the Firewall Client software.If the client installation files are stored on another computer, you can disableFile and Printer Sharing.
■ Client for Microsoft Networks must also be enabled if you want to access resources on the internal network or authenticate to internal resources.
■ Disable NetBIOS over TCP/IP if you do not have any legacy client computers or Net-BIOS-based applications on the network that need access to the ISA Server computer.
■ Leave automatic DNS name resolution enabled on the internal network interface so that the ISA Server computer’s IP address is registered in DNS. If you do nothave automatic updates enabled on the DNS zone, disable this option and manuallyconfigure the host record in DNS.

MCP 70-350 : Introduction to ISA Server 2004

How ISA Server Works as a Branch Office Firewall :

A third deployment scenario for ISA Server is as a branch office firewall. In this scenario, ISA Server can be used to secure the branch office network from external threats as well as connect the branch office networks to the main office using site-to-site VPN connections.

For organizations with multiple locations, ISA Server can function as a branch office firewall in conjunction with additional ISA Servers at other locations. If a branch office has a direct connection to the Internet, ISA Server may operate as an Internet-edge firewall for the branch, securing the branch office network and also publishing server resources to the Internet. If the branch office has only a dedicated WAN connection to the other offices, ISA Server can be used to publish servers in the branch office such as Microsoft SharePoint Portal Server or a local Exchange Server.

One of the benefits of using ISA Server as a branch office firewall is that it can operate as a VPN gateway that connects the branch office network to the main office network using a site-to-site VPN connection. Site-to-site VPN provides a cost-effective and secure method of connecting offices. In this scenario, the following occurs:
1- ISA Server can be used to create a VPN from a branch office to other office locations. The VPN gateway at other sites can be either additional computers running ISA Server or third-party VPN gateways. ISA Server supports the use of three tunneling protocols for creating the VPN: IPSec tunnel mode, Point-to-Point Tunneling Protocol (PPTP), and Layer Two Tunneling Protocol (L2TP) over IPSec.
2- ISA Server can perform stateful inspection and application-layer filtering of the VPN traffic between the organization’s locations. This can be used to limit the remote networks that can access the local network and to ensure that only approved network traffic can access it.

How ISA Server Works as an Integrated Firewall, Proxy, and Caching Server :

In a small or medium organization, a single ISA Server computer may provide all Internet access functionality. The ISA Server computer is used to create a secure boundary around the internal network, and to provide Web proxy and caching services for internal users.

Small or medium-size organizations often have significantly different Internet access requirements than larger organizations. Small organizations may have dial-up or other slow connections to the Internet. Almost all organizations provide at least some level of Internet access to employees, but these offices may need to limit access because of the slow connections. Small organizations frequently do not require any services published to the Internet because their ISP may be hosting both their organization’s Web site and their e-mail servers. Other organizations may have much more complex requirements, including requirements for SMTP, FTP, and HTTP server publishing as well as VPN access. Another unique situation faced by many small or medium-size organizations is that a single network administrator performs all network administration tasks. This means that the administrator is usually not a firewall or Internet security expert. ISA Server is flexible enough to meet almost any small or medium organization's requirements:

1- Configuring caching on ISA Server computers means that Web pages are cached on the ISA Server hard disk. This can reduce the use of slow Internet connections or reduce the cost of a connection where cost is based on bandwidth usage.
2- ISA Server supports the option of using dial-up connections to access the Internet or other networks. You can configure ISA Server to dial the connection automatically when a request is made for access to Internet resources.
3- Installation of ISA Server is secure out of the box. By default, ISA Server 2004 will not accept any connections from the Internet after installation. This means that if the organization does not require any resources to be accessible from the Internet, the administrator does not need to configure ISA Server to block all incoming traffic. All the administrator has to do in this scenario is configure the server to enable Internet access for internal users and the configuration is complete.
4- ISA Server provides network templates and server publishing wizards that can be used to configure most required settings. Configuring ISA Server to provide access to Internet resources can be as simple as applying a network template and using the wizard to configure the security settings. ISA Server provides several server publishing wizards that make it easy to securely publish internal servers to the Internet.

How ISA Server Works as a Proxy- and Caching-Only Server :

A final deployment scenario for ISA Server 2004 is as a proxy server and caching server only. In this scenario, ISA Server is not used to provide a secure boundary between the Internet and the internal network, but only to provide Web proxy and caching services.

In most cases, computers running ISA Server are deployed with multiple network adapters to take advantage of ISA Server’s ability to connect and filter traffic between multiple networks. However, if ISA Server is deployed as a Web proxy- and cachingonly server, it can be deployed with a single network adapter. When ISA Server is installed on a computer with a single adapter, it recognizes only one network—the internal network.

If an organization already has a firewall solution in place, it can still take advantage of the proxy and caching functionality of ISA Server. To deploy ISA Server as a proxy and caching server, you only need to configure it to allow users to access resources on the Internet. You would then configure the Web browsers on all client computers to use the computer running ISA Server as a Web proxy server.
When you install ISA Server on a computer with a single adapter, the following ISA Server features cannot be used:

1- Firewall and SecureNAT clients
2- Virtual private networking
3- IP packet filtering
4- Multi-network firewall policy
5- Server publishing
6- Application-level filtering
These restrictions mean that ISA Server provides very few security benefits for the network.

Préparation MCP 70-270 : Implémentation de Windows XP Professionnel

1. Planification de l'installation de Microsoft Windows XP Professionnel :

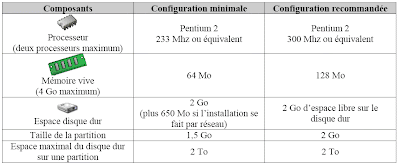
Vérification de la configuration système :


configuration XP pro
Identification des options de partitionnement :

Il est possible de créer à partir d'un seul disque dur, des partitions qui se présenterons comme des disques durs à part entière. Comme précisé plus haut, il est impératif de prévoir au moins 1,5 Go pour l'installation de Windows XP Professionnel. En fonction de l'état du disque hôte, et des partitions qui s'y trouvent, le menu d'installation de Windows XP Professionnel peut proposer les choix ci-dessous :
- Création d’une partition sur un disque non partitionné
- Création d’une nouvelle partition sur un disque déjà partitionné
- Installation sur une partition existante
- Suppression d’une partition


Mise à niveau vers Windows XP Professionnel :

Il est également possible de faire une mise à jour de votre version de Windows actuelle vers Windows XP. Cependant, seuls les systèmes suivants peuvent être mis à jour directement :
- Microsoft Windows 98
- Microsoft Windows Me
- Microsoft Windows NT4 SP5
- Microsoft Windows 2000 Professionnel


2. Automatisation de l’installation de Windows XP Professionnel :

Dans le cadre d'une installation de Windows XP Professionnel sur un nombre important de machines, il est préférable d'utiliser le processus d'automatisation d'installation. Cela se fait grâce à deux fichiers :
- Fichier de réponse
- Fichier UDF
Le premier fichier stocke toutes les informations qui seront communes aux installations (Domaine, options réionales, etc…) Le second fichier va lui stocker les informations spéifiques àchaque ordinateur (nom de l'ordinateur, configuration TCP/IP, etc…) Il faudra ensuite lancer l'installation en indiquant l'emplacement réeau de ces deux fichiers. Aucune intervention de la part de l'utilisateur ne sera ainsi requise pendant le processus d'installation.

Service d’installation à distance :

Le service RIS (Remote Installation Service) est un service de déploiement intégré à Active Directory permettant de déployer Windows XP Professionnel sans intervention de l'utilisateur. Ce service peut être utilisé sans pour autant savoir où se trouve l'iimage du système. Pour lancer le processus d'iinstallation, il suffit de taper F12 au démarrage des ordinateurs équipés de cartes réseaux compatibles PXE (pouvant démarrer à partir du réseau). Pour les machines n'étant pas équipées d'une carte réseau à la norme PXE, il suffit de créer une disquette de démarrage en exécutant rbfg.exe situé dans Sytem32\Reminst. Trois services doivent être présents sur le réseau en plus du service RIS pour envisager cette méthode de déploiement :
- Service DHCP (pour attribuer des adresses IP aux ordinateurs clients)
- Service DNS (pour localiser les serveurs)
- Serveur exécutant Active Directory (pour localiser le serveur RIS)

3- Configuration du matériel sur un ordinateur exécutant Windows XP Professionnel :

Installation et configuration de périphériques matériels :

Avant de débuter l'installation d'un nouveau périphérique sous Windows XP Professionnel, il est impératif de vérifier que celui-ci se trouve bien dans la dernière version de la HCL (Hardware Compatibility List).

S'il s'agit d'un périphérique Plug-and-Play, l'installation sera facilitée car Windows XP le détectera automatiquement, l'installera et le configurera.

Dans le cas d'un périphérique non Plug-and-Play, celui-ci nécessitera un pilote fourni par le fabriquant, qu'il faudra fournir à Windows XP Professionnel pendant la procédure d'installation.

Il est également important de noter qu'il faut disposer des droits d'administrateur pour installer un nouveau périphérique (sauf pour l'installation d'une imprimante locale). Il est possible de visualiser la liste des périphériques qui sont installés sur Windows XP Professionnel grâce au gestionnaire de périphériques.

Cet outil est accessible en faisant un clic droit sur le poste de travail, puis en sélectionnant Propriétés / Gestionnaire de périphériques. A partir du gestionnaire de périphériques, il est possible de supprimer, désactiver, mettre à jour tous les périphériques. Il suffit pour cela de faire un clic droit sur le périphérique en question, puis de faire son choix dans le menu contextuel qui apparaît.

Le plus souvent, les imprimantes étant des périphériques Plug-and-Play, leur installation est automatique dès leur connexion. Cependant, il est possible d „exécuter cette opération manuellement (si par exemple l'utilisateur désire utiliser un autre pilote que celui fournit par Microsoft). Pour se faire, il suffit d'ouvrir le panneau de configuration, puis de cliquer sur Imprimante et autres périphériques, puis sur Imprimantes et télécopieurs. Ensuite sous tâches d'impression, il faut cliquer sur Ajouter une imprimante et suivre les instructions.

Configuration de Microsoft Windows XP Professionnel pour fonctionner sur des réseaux Microsoft :

Etude des groupes de travail et des comptes d’utilisateur :

Un groupe de travail est un ensemble d'ordinateur connecté à un réseau qui partage des ressources. Chacun des comptes utilisateur voulant accéder aux ressources du réseau devra être recréer sur chacune des machines auxquels il voudra accéder (ex : 3 utilisateurs pour 3 machines = 9 comptes à créer ou 50 utilisateurs pour 50 machines = 2500).

Ce type de structure est envisageable dans le cas d'une petite entreprise ayant peu d'ordinateur mis en réseau. Cela évite de mettre en place un serveur.

On distingue trois types de compte utilisateur :
- Compte d’utilisateur local : Permet d’ouvrir une session localement sur un ordinateur. Il est stocké dans la base SAM de l’ordinateur.
- Compte d’utilisateur de domaine : Permet d’ouvrir une session sur le domaine, et par conséquent d’accéder aux ressources de ce dernier.Il est stocké dans l’annuaire Active Directory.
- Compte d’utilisateur prédéfini : Administrateur et Invité, on ne peut pas supprimer ces comptes. Le compte invité est désactivé par défaut. La compte Administrateur et les seul compte par défaut qui à TOUT les droits d’administration et de gestion sur l’ordinateur.

Création et authentification de comptes d’utilisateur locaux :

Pour créer un compte d'utilisateur local, il faut passer par la fenêtre Gérer (disponible via le menu contextuel du Poste de travail), puis choisir l'option Utilisateur et groupes locaux, puis choisir l'option Nouvel utilisateur en faisant un clic droit sur Utilisateur.

Il s'agit après d'entrer les informations relatives à cet utilisateur. Une fois le compte utilisateur créer, il faut savoir qu'il aura des droits limités, cela signifie que l'utilisateur qui utilisera ce compte pour se connecter à l'ordinateur ne pourra pas effectuer des taches administratives comme par exemple installer un nouveau pilote pour un périphérique.

La méthode la plus facile pour changer le rang du compte utilisateur consiste à passer par le Panneau de configuration et d'entrer dans le menu Compte d’utilisateurs, puis sélectionner le compte que l'on veux modifier, cliquer sur Propriété, choisir l'onglet Appartenance au groupe et enfin choisir le niveau daccès de l'utilisateur. Notez qu'il y a trois options et non deux (Administrateur, et limité). La dernière option, Autre, permet de personnaliser le niveau d'accès du compte en l'affectant à un groupe ayant des niveaux d'accès bien particuliers.

Il est important de comprendre que l'une des plus grandes caractéristiques d'un groupe de travail est l'authentification qui se fait à un niveau local. C'est-à-dire que c'est la machine où l'utilisateur se connecte qui validera ou non l'ouverture de session. Si celle-ci abouti, l'utilisateur obtiendra un jeton d’accès qui constituera l'indentification de l'utilisateur pour cet ordinateur local et contient les paramètres de sécurité de l'utilisateur (ex : la liste des groupes auxquels il appartient).

Microsoft Certified System Engineer

MCSEs La certification Ingénieur Microsoft MCSE est le titre le plus reconnu et le plus demandé dans le domaine des technologies Microsoft. La certification ingénieur Microsoft MCSE est une stratégie intéressante pour démontrer à des entreprises ou des clients une expertise technique et opérationnelle dans le domaine des Technologies Microsoft.


L'ingénieur MCSE est certifié par Microsoft pour étudier, mettre en oeuvre,
maintenir et supporter les plates-formes informatiques basées sur Microsoft Windows Server.

Google